5. Components
metaScore applications function on the basis of a three-level architecture:
- blocks: the windows that compose your application. Only in these blocks can you insert elements or images.
- pages: each block includes one or more pages, the turning of which will, according to the block type, be synchronized or unsynchronized with the media file.
- elements and images: the objects you can insert into metaScore.
These components are added by dragging and dropping them into the editing window.
Controllers and video renderer
Independently of this three-level system, you can insert controllers located at the bottom of the component list. They function as independent blocks, but ones in which you cannot insert pages or objects:
- video renderer: a video window displaying the media file (for videos only).
- controller: a player that displays the time and allows users to play/stop/restart the media file.
Careful: the player and timeline at the bottom of the editor will not be accessible to the application’s end users. Inserting a controller may prove necessary as a complement or alternative to navigating with text or image links. - block controller: a window that automatically generates buttons allowing you to make a block appear or disappear. You choose the blocks affected by this controller by left-clicking on them in the “Blocks” section of the attribute window. A diagram representing the selected blocks will automatically be displayed in the window of the controller, with the block in question in black and the others in light gray. In preview mode, click on the corresponding diagram to display or hide a block.

Attention: you must make the block controller wide enough for all the requested diagrams to be displayed.
“Synchronized blocks” and “unsynchronized blocks”
There are two ways to insert a synchronized or unsynchronized block:
- drag and drop from the browser’s “Components” menu into the editing window.
- right-click on an empty space in the editing window, then choose the “Block” menu and “Add a block”.
Click once on the block to select it, then again on the bar that has just appeared at the top of the block.
By clicking on it and holding, you can move the block to the editing window.
By clicking on one of the handles, you can adjust its size.
Synchronized block: lets you associate each of its pages with a specific sequence in the media file. They will thus automatically appear in this order as the file plays. This block type is particularly useful when its content is directly linked to the sequence of the media file.
N.B.: if you manually turn the pages of a synchronized block, the media file goes directly to the time corresponding to the beginning of the page.
Unsynchronized block: composed of pages independent of the media sequence. The user can view them in any order without affecting the playing of the file, by clicking on the browsing arrows to the right of the block’s menu bar or by calling them up with the help of links (see the user guide’s “Creating links” page).

Note: it is possible to manage the display of the page-turner navigation arrows while working on the application from the attributes window of a block (whether synchronized or not). Three functions: “Displayed,” “Hidden,” or “Auto” (if the block includes more than one page, the page-turner appears by moving the slider in front). Whichever setting is chosen, the page-turner will remain active in editing mode.
This type of block is particularly useful for giving contextual information unconnected to a specific sequence in the media file (author, aesthetics, historical context, etc.).
Block arrangement: when two blocks overlap, the one created most recently automatically appears in the foreground. To modify this order, select the block, right-click on it and open the menu “Block > Arrangement,” or reorganize the positions of the elements on the timeline (see “Using the timeline and managing timecodes”).
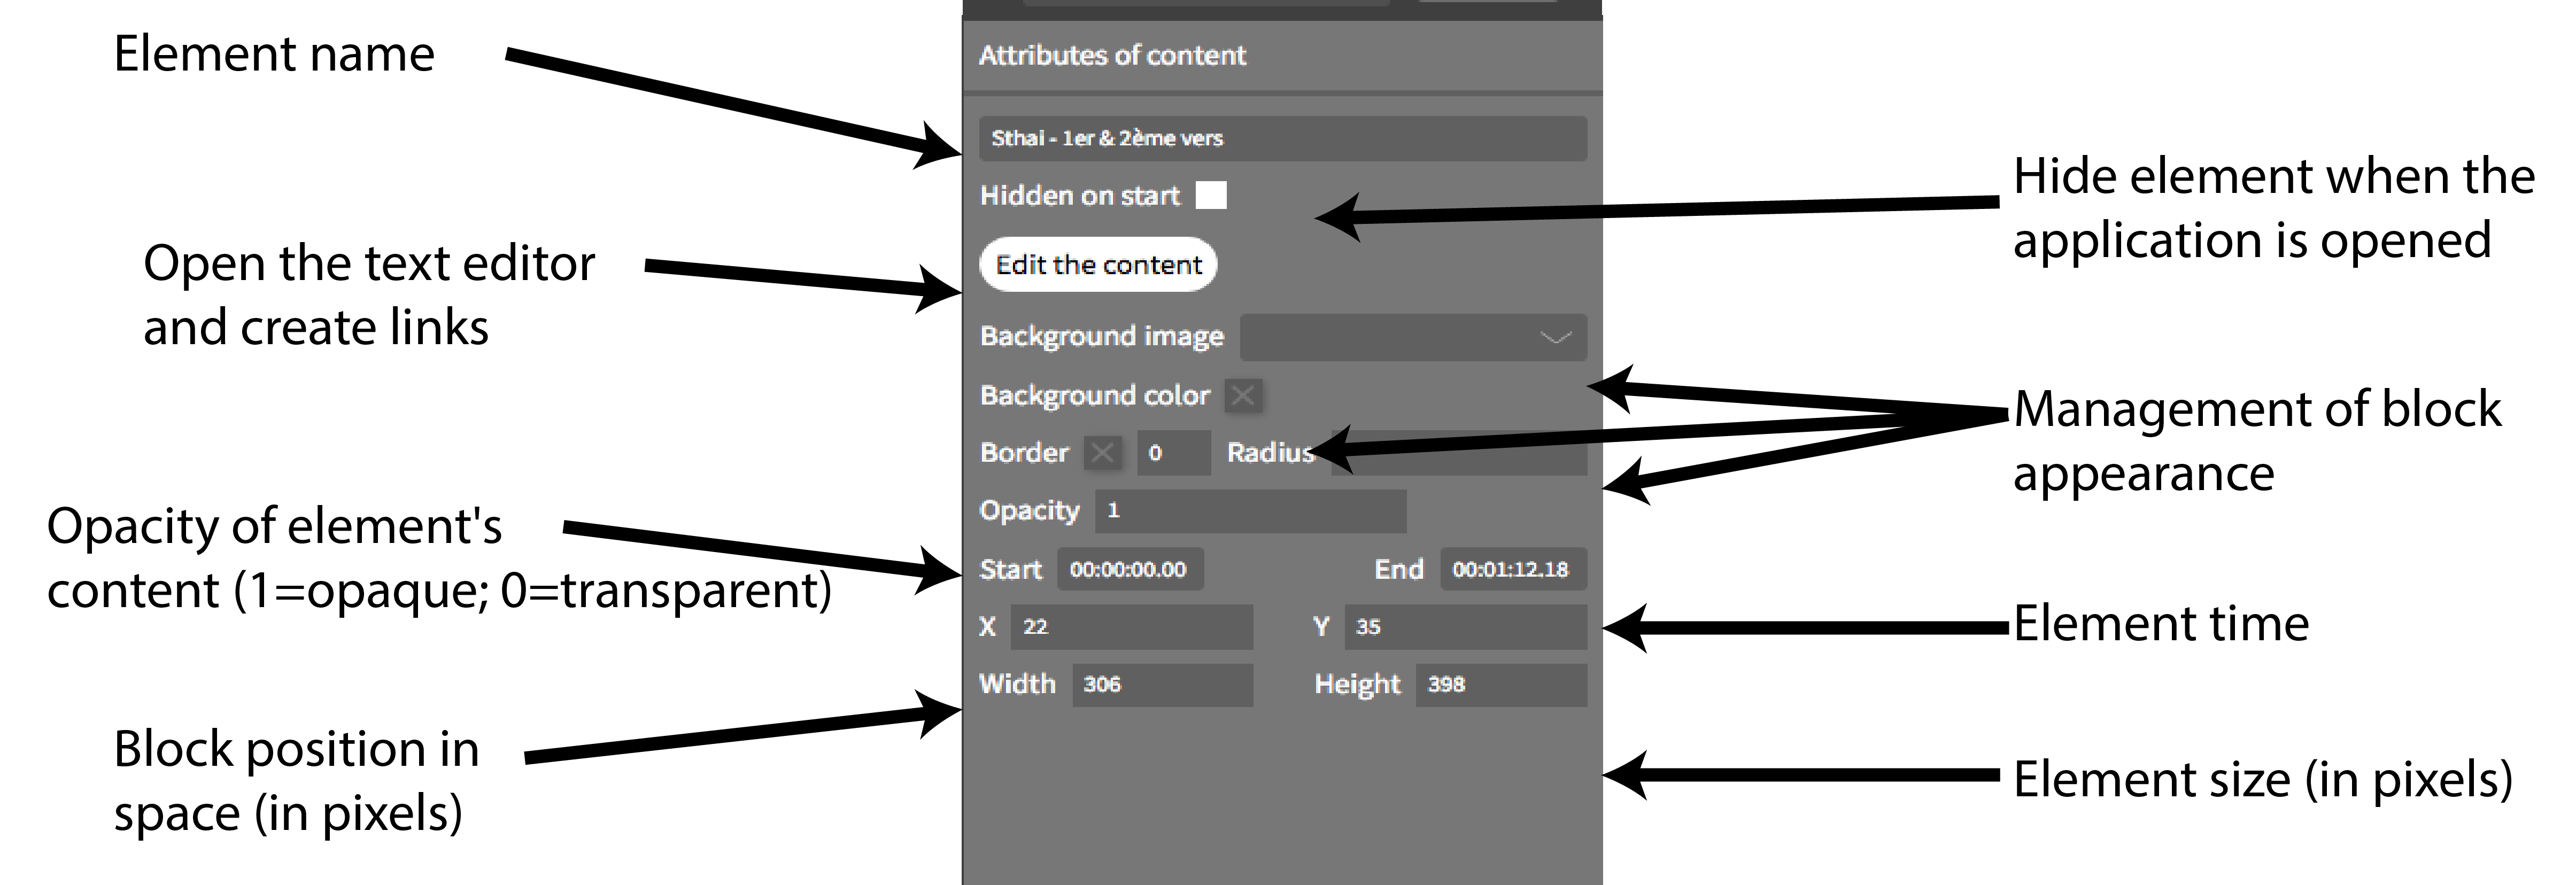
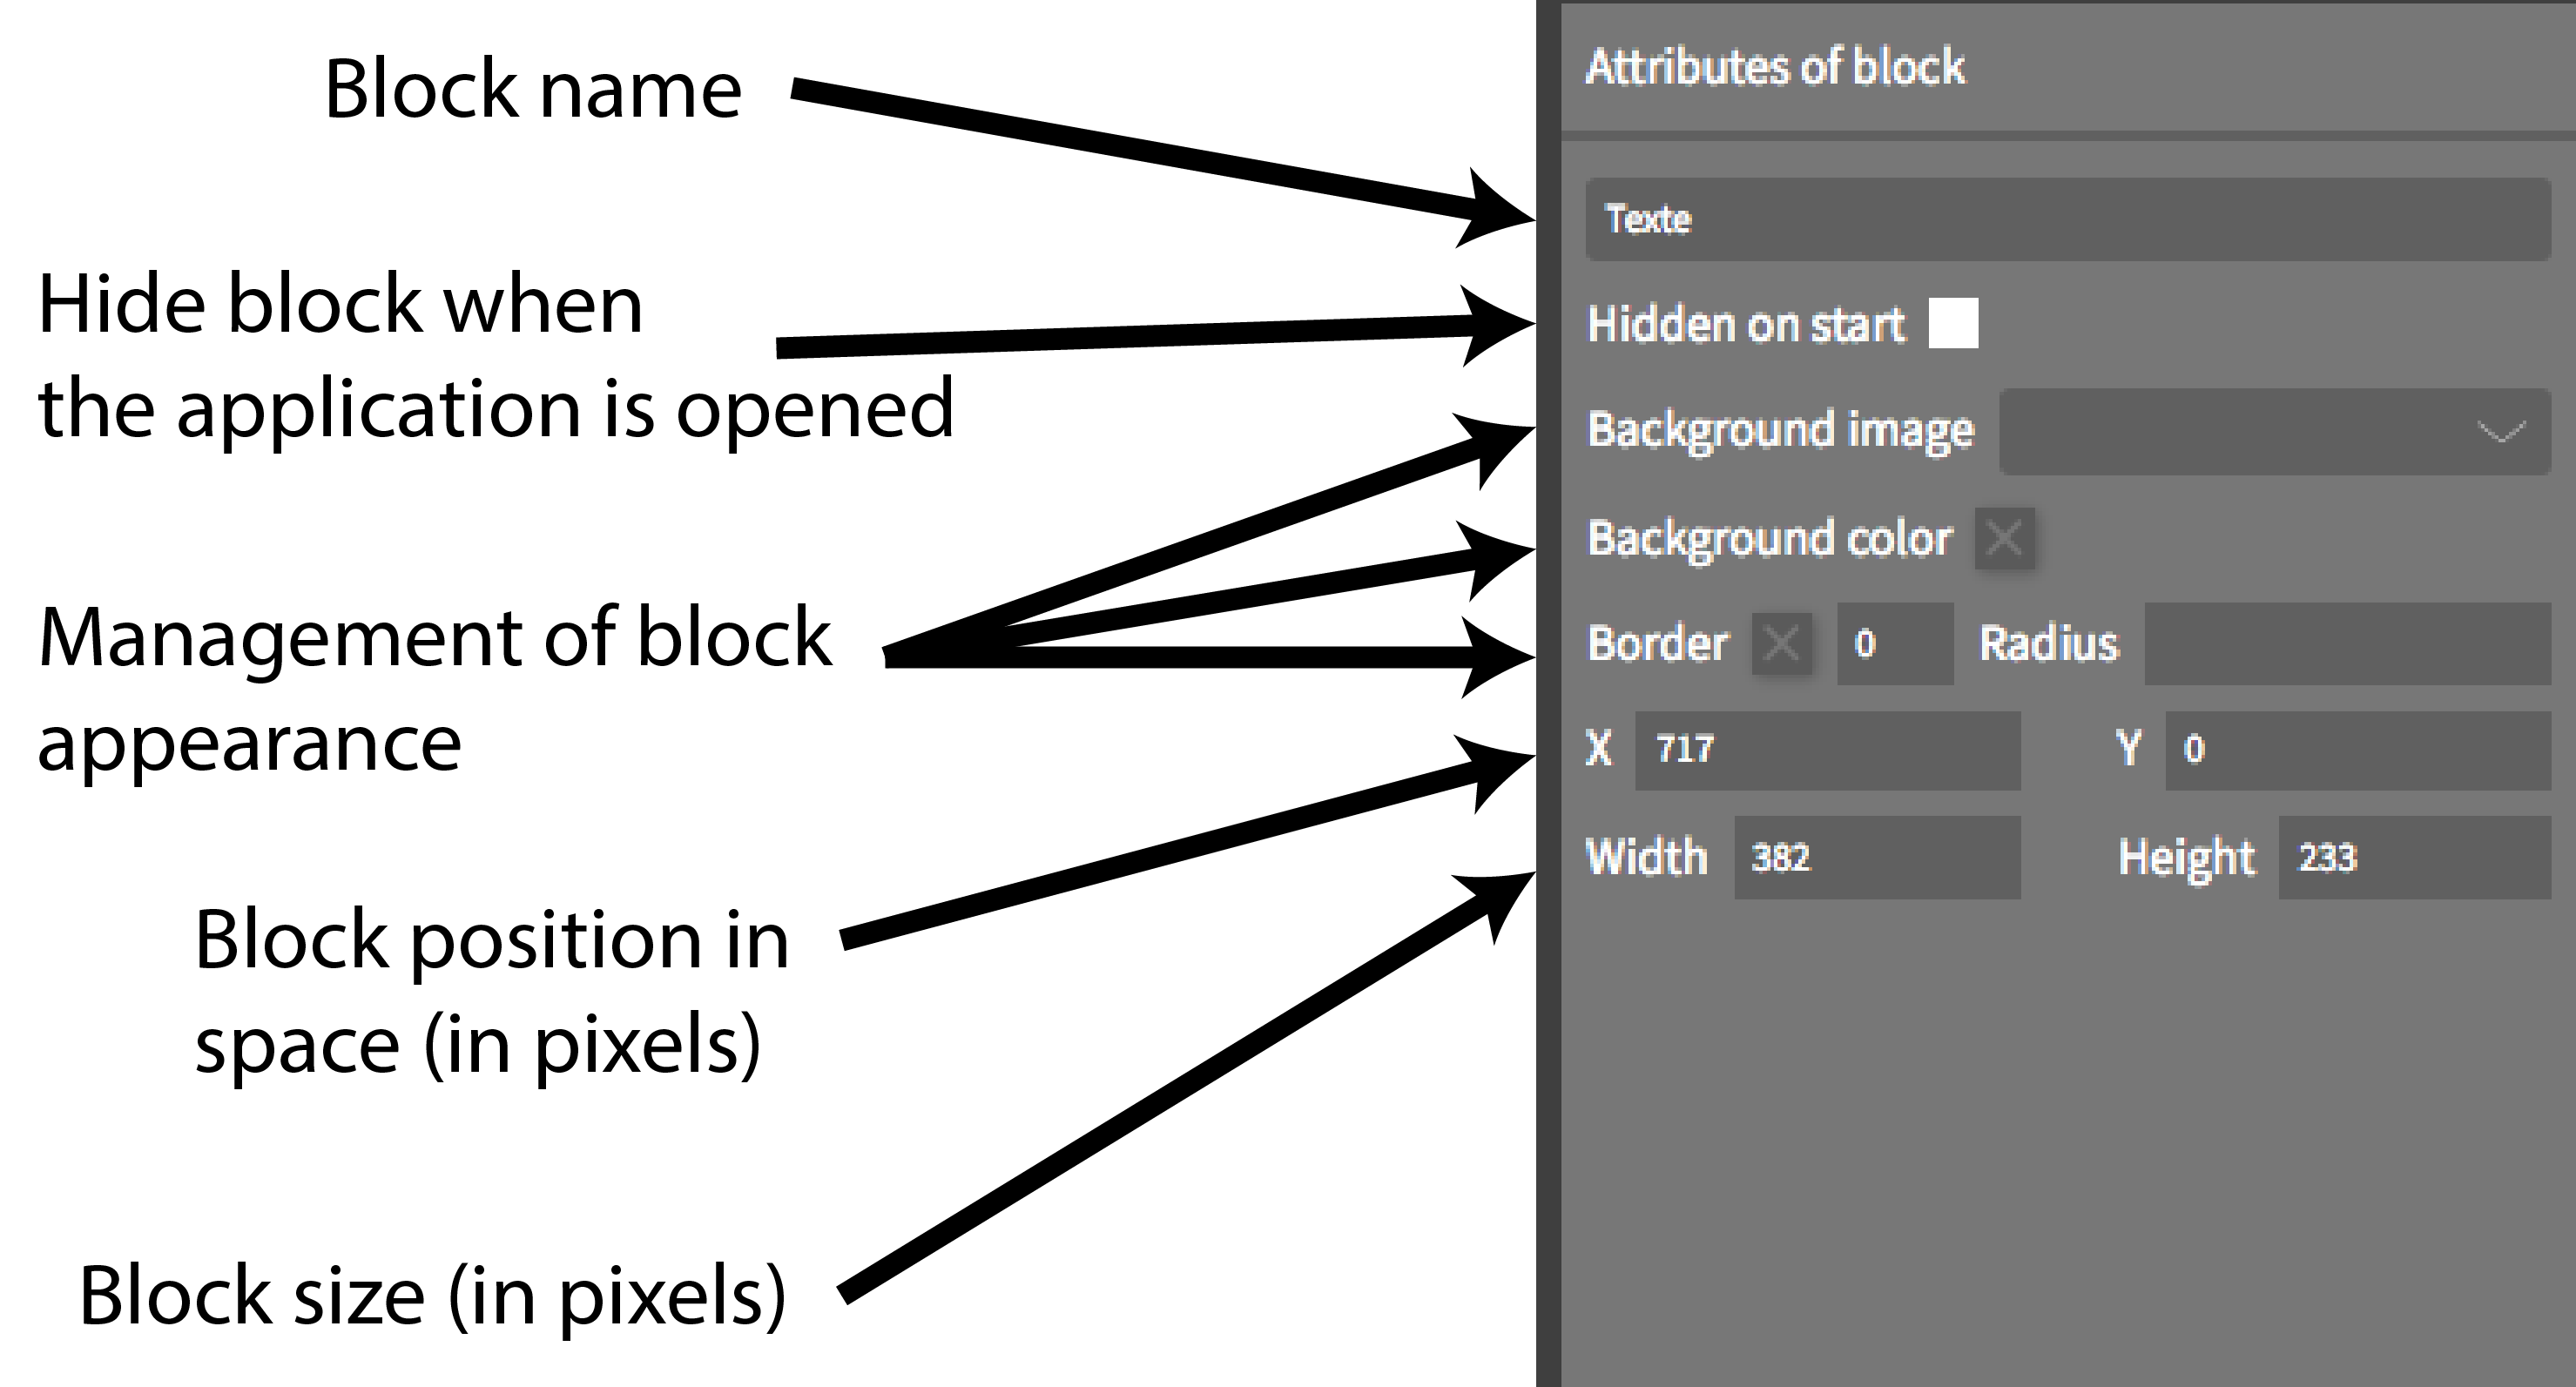
Block attributes: when a block is selected, the attributes window allows you to edit a certain number of the block’s attributes.
Pages
The creation of each new block automatically includes a first page. You can subsequently create as many pages as you wish, allowing you to display a large quantity of elements within the same space in your application.
There are two ways to create a page:
- drag and drop from the browser’s “Components” menu to the chosen block.
- or right-click on the chosen block and open the “Page” menu. You can then choose to create a page before or after the one displayed (or to erase this one if there are others).
N.B. 1: the easiest way to set the turning of a page at a specific time t is to position the media file at time t and create the new page. It will automatically take time t as its start time.
N.B. 2: the end time of the last page of a synchronized block always corresponds to the end of the media file. Indeed, the pages of a synchronized block always cover the entire media file.
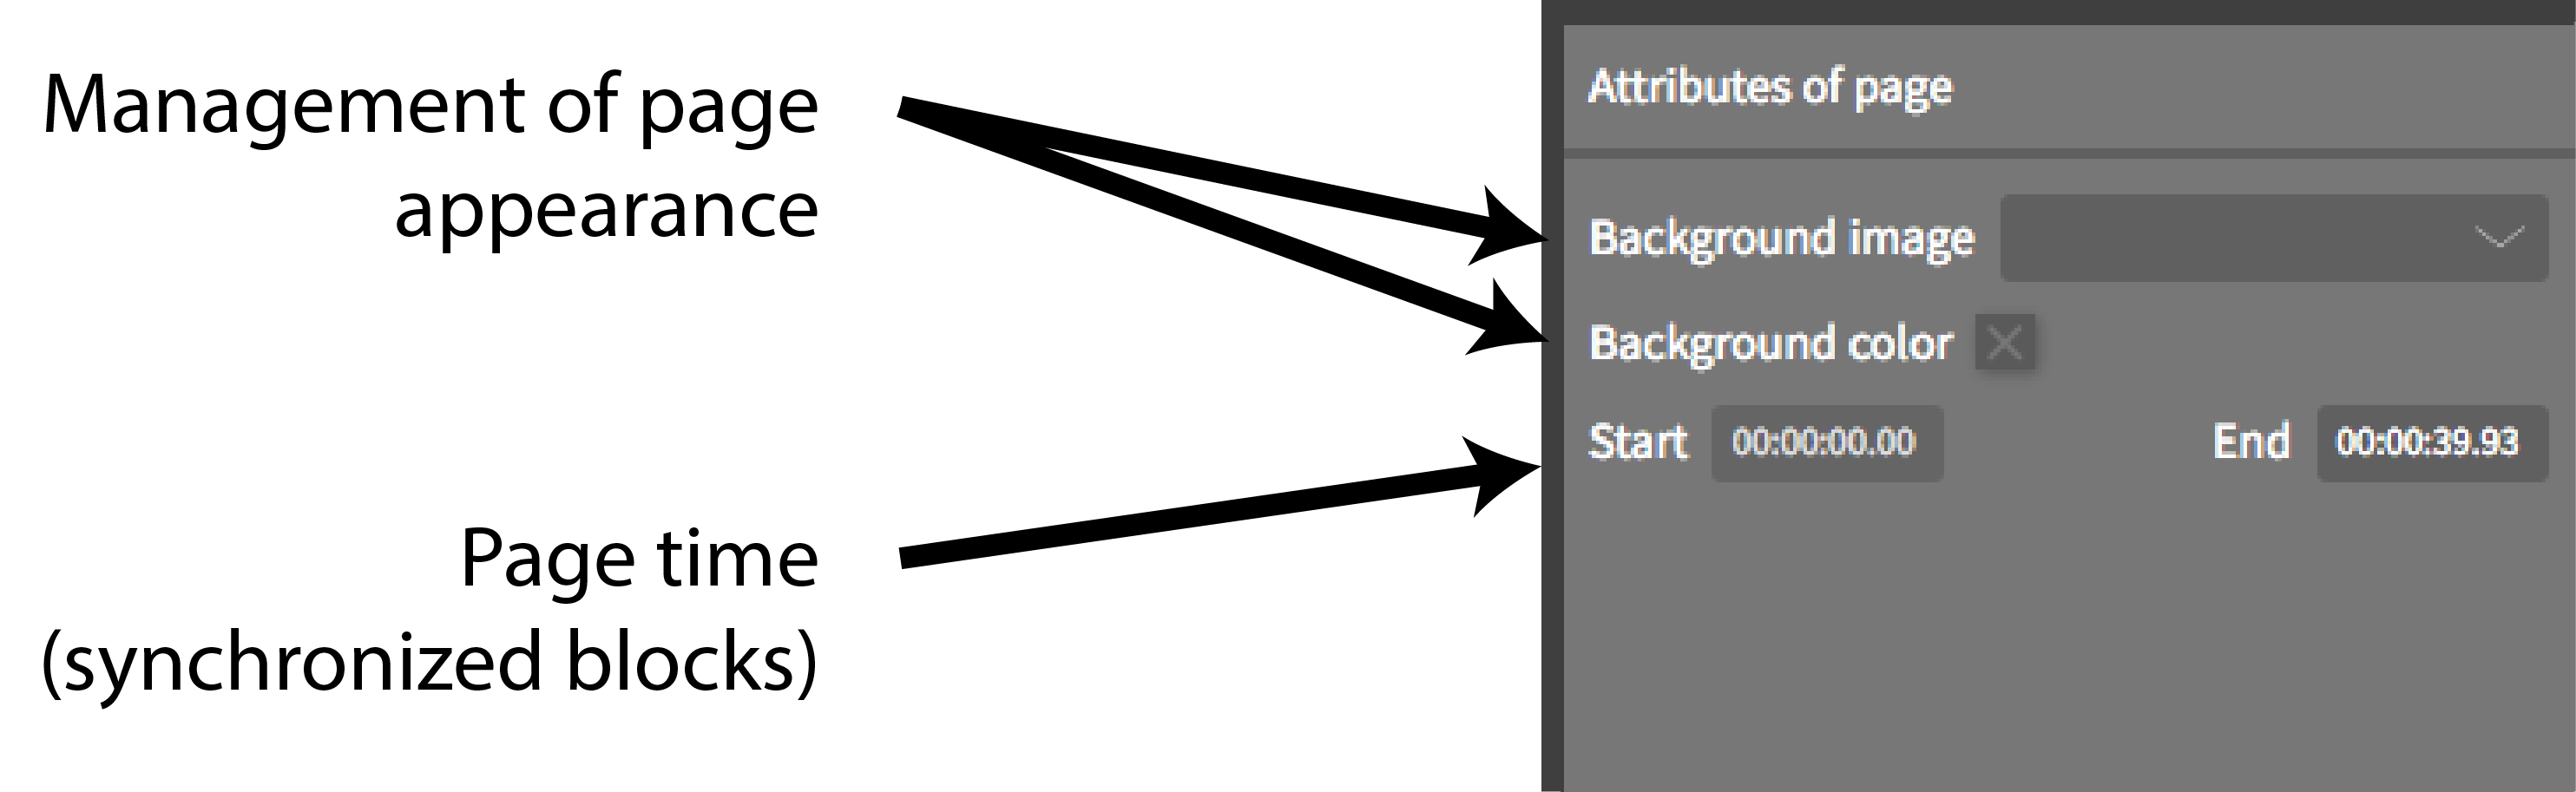
Page attributes: when a page is selected (for example, by clicking on the timeline), the Attributes window lets you edit a certain number of its features.
N.B.: a page’s image or background color is located in front of the image or background color of the block to which it belongs. It is possible to modify the transparency of a page’s background color in order to display the background image or the color of the block only in part
“Sliders” and “content”
The elements are the heart of your application’s content. They allow you to display images, text, images within text, and sliders.
To insert an element, drag and drop it into an existing block.
Slider: explained in detail on a dedicated page in this user guide: “Using sliders”.
Content: allows you to include text as well as images within a text, and to make this content interactive in the form of a link (see “Creating links”).
Once you have dragged and dropped, a square outlined in green will appear in the block. Click once on the element to select it, then proceed as you would for a block to move or resize it.
To write or format text, just double-click on it, or click on “Edit Content” in the Attributes window. This new window lets you access all the tools for text editing, inserting images, special characters or tables, and even creating links.
Arrangement of the elements: as in the case of blocks, when two elements overlap, the one created most recently automatically appears in the foreground. To modify this order, select the element, right-click, and then open the menu “Element > Arrangement”, or reorganize the positions of the elements on the timeline (see “Using the timeline and managing timecodes”).
Element time: by default, a content or slider element will adopt as its start time the time of the media file where it is inserted, and as its end time that of the page in which it is inserted (meaning the end of the media file for a last page in a block or in the case of a single-page block).
Element attributes: when an element is selected, the Attributes window lets you modify a certain number of its attributes (for sliders, see “Using sliders”).